DIY High Quality Monitor Controller

Since quite some years I was searching for a payable high quality monitor controller which would fulfill the following requirements:

  • 1 x stereo audio input (from DAC)
  • 3 x stereo audio output for 3 different pairs of speakers/monitors
  • 1 x stereo audio send to / receive from sub
  • Big handy volume knob
  • Mono / stereo / reverse mono switch
  • Overall passive and balanced (XLR) design
  • Metall case / EMC-safe/compatible
  • High overall audio quality, means: controller shall not color or affect the frequency spectrum and stereo image
  • Usage of high quality components (especially attenuator, XLR sockets, etc.)
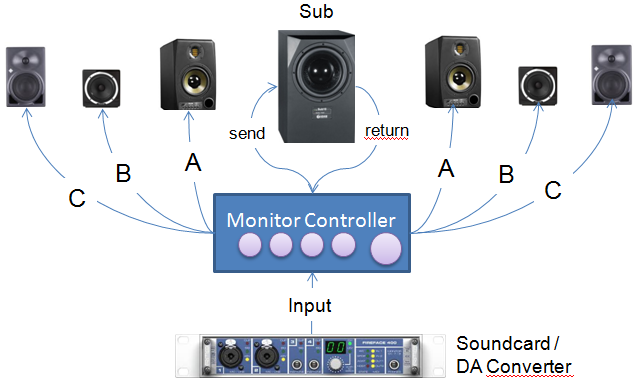
Possible Equipment Setup

There are many controllers on the market ranging from low cost stuff like the passive TC Electronic Level Pilot to high end active/passive solutions like the Crane Song Avocet. Unfortunately none of them completely fulfilled my requirements, or they were just way too expensive.

After some research for payable alternatives I stumbled upon a gearslutz thread from NF Audio. NF Audio is a small australian company run by Nick Franklin. See also https://www.facebook.com/NF-Audio-113771681984134/. He builds high quality passive monitor controllers by hand with a moderate price tag. That’s one of his controllers (NF MC10):
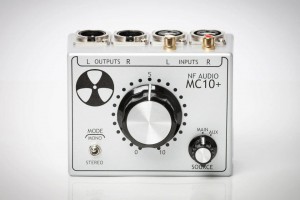
NF Audio MC10
NF Audio MC10+

Unfortunately, his product portfolio also didn’t completely fulfill my requirements. So I contacted Nick via email. He’s really a nice guy and gave me helpfull detailed technical hints and support for free. THANKS A LOT NICK ! With help of his support, and a very helpfull article from Rob Squire (See http://www.proharmonic.com/articles/AT78_OTB.pdf), I was able to design my own monitor controller which finally fulfills my requirements. In this article I’ll describe the whole thing in detail. Let’s start with some pictures:

Overview / Pictures
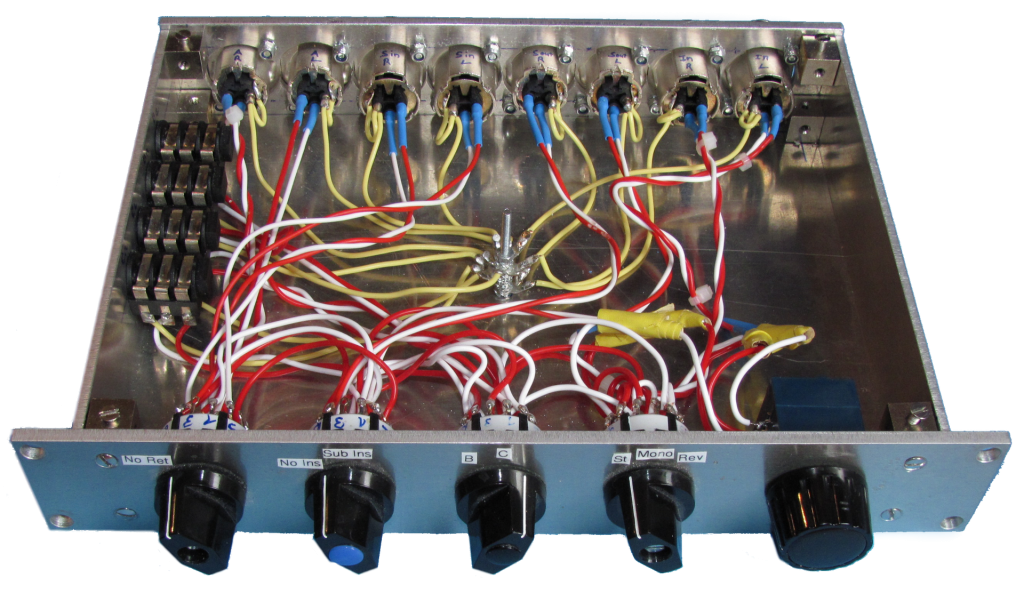
Monitor Controller Front
Monitor Controller Rear
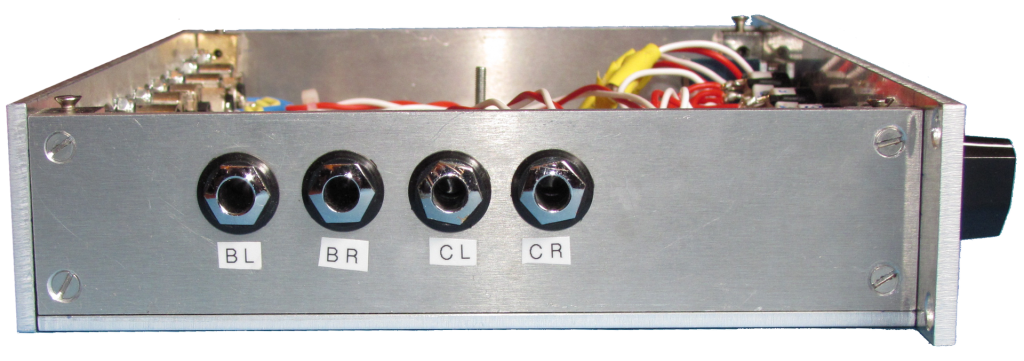
Monitor Controller Side
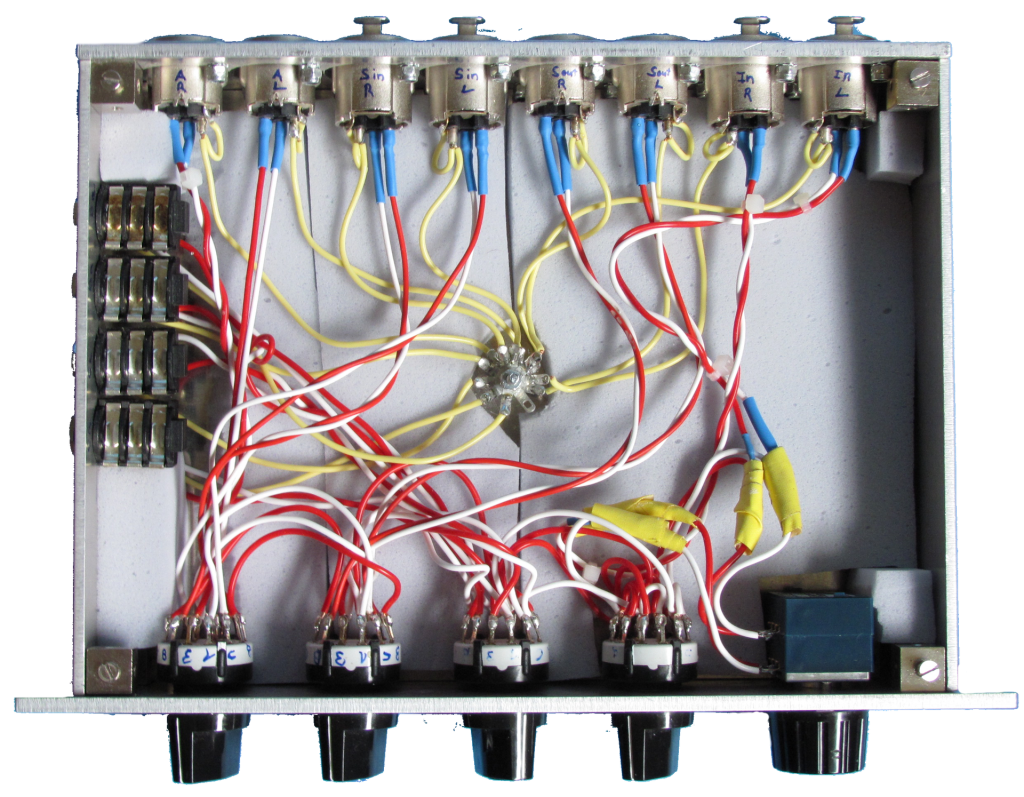
Monitor Controller Top

Signal flow and electrical scheme
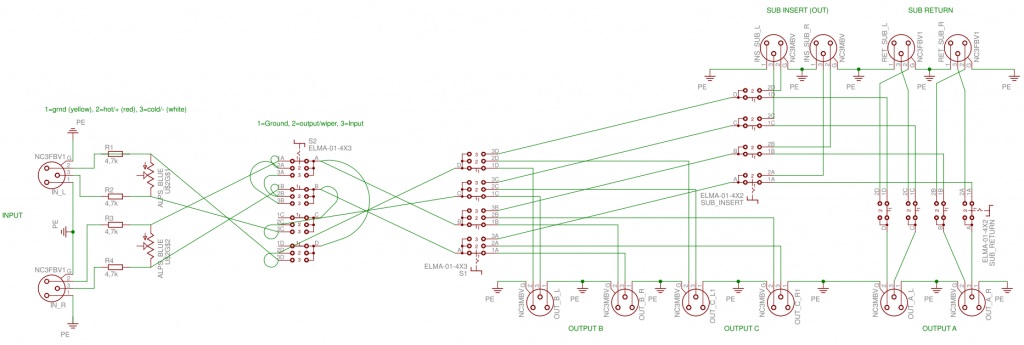
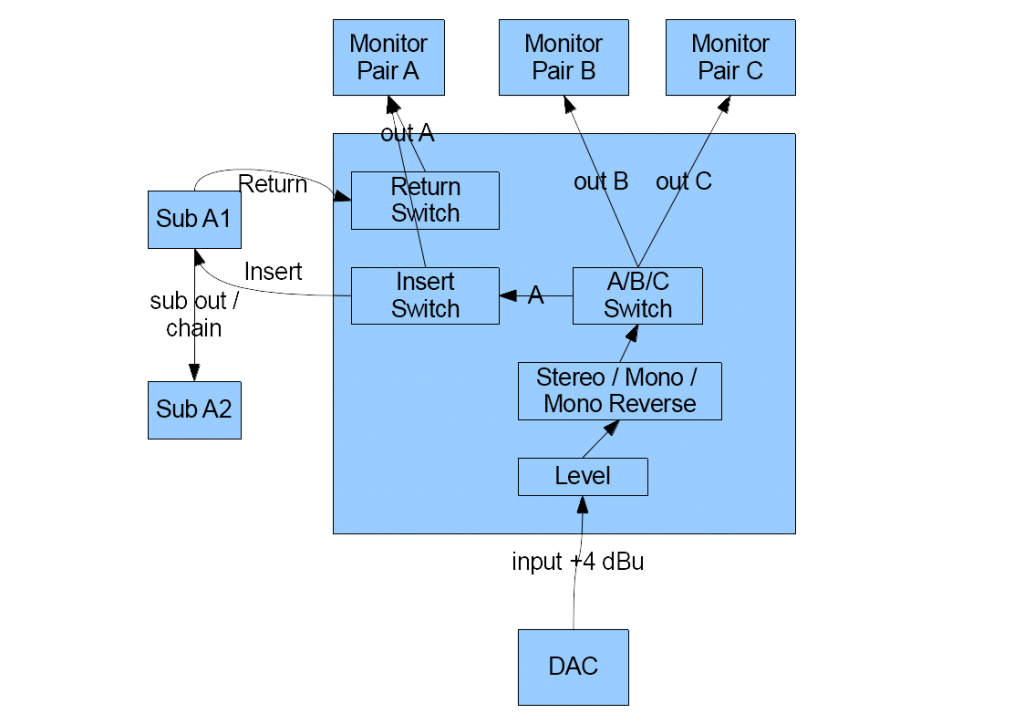
Signal Flow
Signal Flow
Electrical Scheme
Electrical Scheme

It’s a passive design
There are no active components in the signal path. Why a passive design ? Answer: sometimes the simple things are the best. It seems that for short cable distances a passive design is the best solution: citing Rob Squire: …for cables less than 10m long you’ll have a volume control with a frequency response from DC to over 50kHz and more headroom and a lower noise floor than anything you’ll hope to own that you can actually attach to either end.

It’s a balanced design
All signal ground wires are soldered together (star design). This design still removes hum and noise, but allows for a simplified electrical scheme, lesser wires, smaller potentiometer and smaller rotary switches (less decks necessary).
Hint: the star design is no must have. If you don’t connect the ground wires to the case it’s also ok !

The volume controller
A four deck potentiometer and four resistors are the first components in the signal chain. Together these components build the volume controller, also called attenuator or variable pad. The attenuator dampens the signal level around a maximum amount. (e.g. around -0 dB .. -60 dB).

The minimum and maximum signal level drop heavily depends on the used variable pad. Also does the kind of volume curve (logarithmic / linear) and the accuracy of the stereo signal (ganging of left and right signal path).

Generally, there are two types of potentiometers: stepped and non-stepped. Non-stepped potentiometers, usually conductive plastic pots, allow for finer volume adjustments, but the resistor tolerance is around +/- 20%. Means: the difference between left and right damping curve is higher (especially at minimum/maximum positions).

A stepped potentiometer consists of several discrete damping steps (e.g. 24 or 48 steps). Usually low tolerance resistors (+/- 0,1%..1%) are used for each step. Thus, the difference between left and right channel is minimal. Non-stepped attenuators are often cheaper and smaller. Stepped attenuators – especially those with many steps – are usually more expensive, but are more robust and last longer. The choice is a matter of personal preference.

Moreover, for a balanced stereo design, the pot must provide 4 decks. For a fully balanced stereo design even 6 decks are necessary. In the pictures above an ALPS Blue 10K Log 4 deck version was used. That’s a good pot, but the stereo ganging is suboptimal. Meanwhile I replaced that ALPS pot with a Goldpoint 24 stepped pot and I’m really happy with it. Since I used the Goldpoint the overall stereo image is just better.

Next component in the signal path is the mono/stereo/mono reverse switch

This rotary switch either sums up left and right stereo channels into mono (l and r are the same), or alternatively into mono reverse (= l and r contain only stereo parts). This is very helpfull for checking and analyzing the mix. The wiring scheme looks like this:
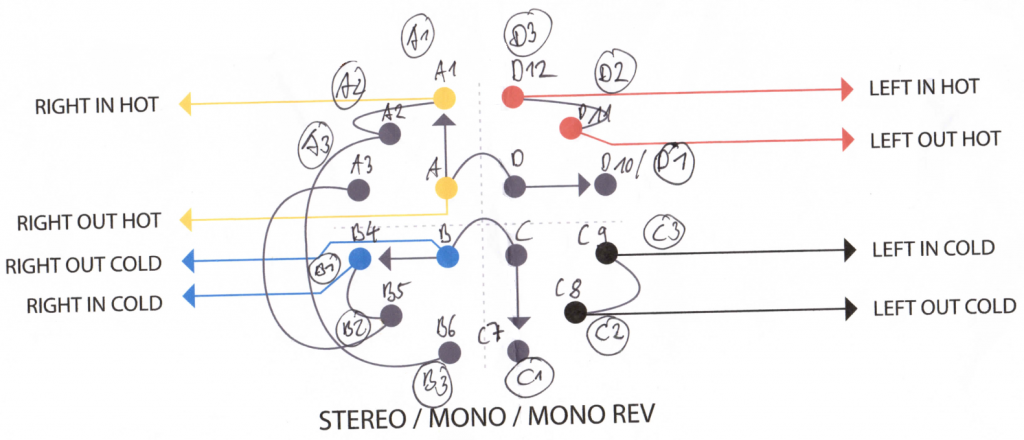
Stereo / Mono / Mono Reverse Wiring Scheme

Sub insert fx

A special personal requirement was the optional insertion of my sub into the signal path. Means: I wanted to be able to easily switch between sub in and sub bypassed. That’s comparable to the the Focal CMS sub on/off feature: the sub can easily be switched on/off via remote foot switch. In my case I used a rotary switch for that.

The original signal is sent to the sub, which optionally cuts off the sub frequencies using an adjustable highpass filter and returns the resulting signal back to the monitor controller. In other words: the sub may be considered as a classical insert effect.

Finally

I use this controller since many years now, and I’m very happy with it. Which matters most is the simplicity, the overall balanced design and the goldpoint volume controller with it’s perfect stereo imaging. Thus, I really recommend to use a stepped potentiometer as volume controller.

Posted in Production, Tech Stuff | 2 Comments

How to refurbish Amiga tracker and chip tunes

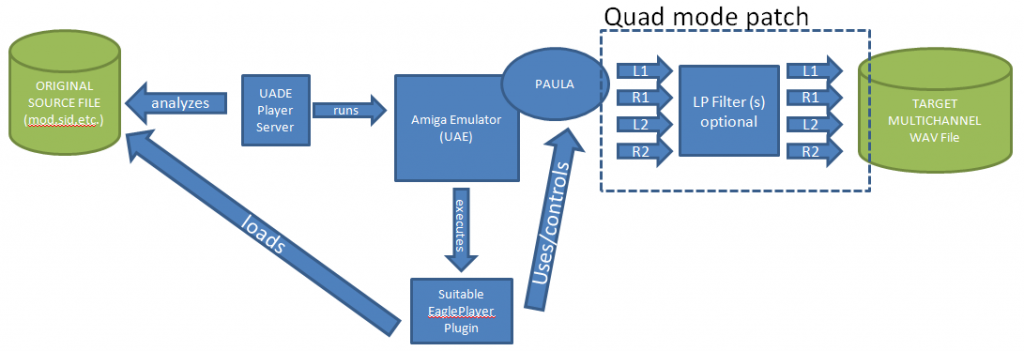
In the following article I describe a process for refurbishing old Amiga tunes. This is a follow-up to http://blog.airmann.de/uade-multichannel-audio-support.

First, what’s the motivation behind ? Why refurbish Amiga tunes at all ?

Answer: original tunes often are poorly mixed and are not optimized for playback on modern audio equipment. So the goal is to polish those gems soundwise without altering the tunes itself, and finally transfer them into proper formats for playback on nowadays audio equipment.

So why should the original mixes be not optimal ? What’s the matter ?

  • technical limitations: most ancient trackers didn‘t provide EQ‘s, filters, stereo balancing, compressors, delay, reverb, etc.. Thus, the mixing results were pretty limited
  • missing original author‘s audio mixing skills / awareness: E.g. no proper stereo balancing, frequency balancing and volume leveling. E.g. bass and drums tracks were panned hard to left/right, frequency ranges of instruments overlap, etc..
  • A lot of ancient samples and waveforms contained DC offset which negatively affects bass frequency range

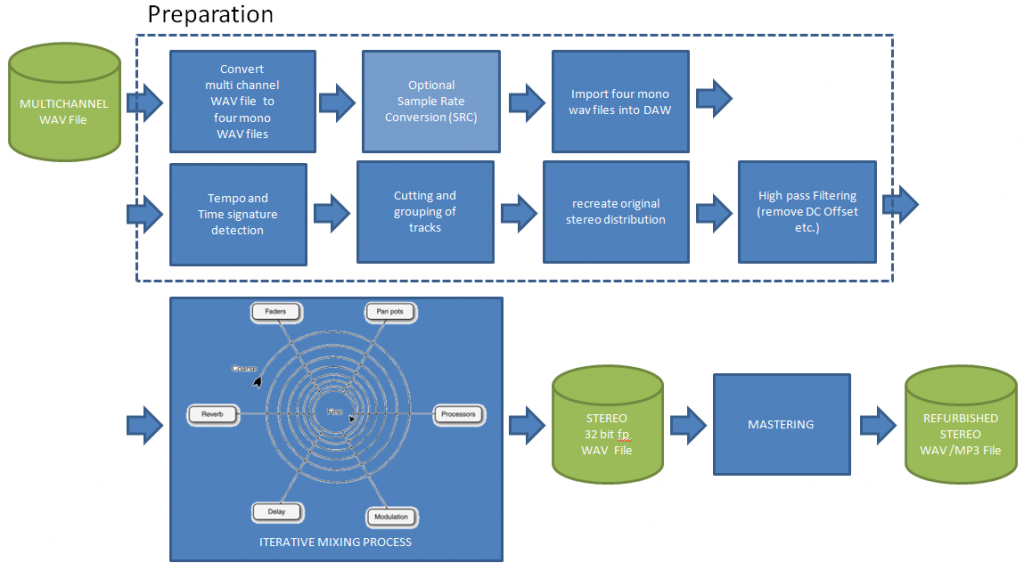
Ok, so how does the refurbishing process look in detail ? Answer: for more information read the following script in PDF format:

How_To_Refurbish_Amiga_Tracker_Chiptunes

For the lazy visual guys:

Overall Refurbishing Process
Quad Mode Rendering Part
Postprocessing Overview
Posted in Amiga, Production, Tech Stuff | 10 Comments

Wise Men’s Headcrash

This track was an entry for SounDevotion Competition #88 and won first place. This is the final remastered version of the original entry.

I used the free U-he Tyrell No. 6 synthesizer as single sound source. No other source material or samples were used.

Song is about bibleserver.com/text/NIRV/1%20Corinthians1 (1. Corinthians 1,18f)

Picture was taken from Wikimedia Commons, created by Wellcome Images.

Posted in Tracks | Leave a comment

Best of Amiga 1988 demos video reaches 1000 thumbs up

Yeah, my Youtube video with nicest Amiga 1988 demos exceeded the 1000 thumbs up with only 25 thumbs down. Means: 98 percent of the people like the video. Also it reached in the meanwhile 150.000 clicks/views.

I compiled this video in 2006, but published it in 2012. Check it out. It contains some really wonderfull tunes from heros like Karsten Obarski et al. These guys laid the foundation of nowadays tracking scene.

Posted in Amiga, Videos | 1 Comment

All Our Trials [OSC #70]

this is my first entry for the “One-Synth-Challenge #70“. It reached #12 place out of 33.

Written and mixed with Renoise 3.0 and 16 instances of “Ragnarök” by Full Bucket Music & CrimsonWarlock, a freeware VSTi, as the only source of sound.

host-internal DSP used:
– 15 x Filter device (freq cutting),
– 4 x EQ device (sound shaping)
– 2 x Convolution device (Only for Reverbs !)
– 1 x Maximizer/Limiter

External VST (fx) used:
– 4 x NastyDLAmkII (delay)
– 1 x Kiesel Free Delay (delay)
– 3 x DensitymkIII (compressor)
– 1 x TDR Feedback Compressor II
– 2 x ThrillSeeker LA (compressor)
– 1 x ThrillSeeker VBL (compressor)
– 1 x FerricTDS (tape compressor)
– 2 x ReaXComp (multiband compressor)
– 1 x ThrillSeekerXT (equalizer)
– 2 x Luftikus (equalizer)
– 1 x TDR Vos Slick EQ (equalizer)
– 2 x Transient (volume env. shaper)
– 1 x Polarity (polarity switcher, since DAW lacks it)

BPM: 125

Picture by Stefan Wernli, CC-BY-SA 2.5 Taken from Wikimedia commons

Posted in Tracks | 1 Comment

Cruisin’ [REMASTER]

This is a remixed and remastered version of the chiptune “Cruisin'” by Pink of Abyss. This tune was part of a Amiga 40K demo intro for Mekka/Symposium in 1997. See also www.shinen.com/music/. For video of demo see: www.youtube.com/watch?v=oVbjBkDtVDw.

The tune is also the demo song of UADE 2 (Unix Amiga Deliplayer Emulator.) an audio player for Amiga tunes.

The original four channel AHX file had no proper mixing and mastering. This tune was remixed and remastered by Airmann to demonstrate the possibilities of Airmann’s UADE 2 patch for multichannel audio export: see blog.airmann.de/uade-multichannel-audio-support/.

All rights of original song reserved by Pink of Abyss. All rights of remastered release reserved by Airmann.

Posted in Amiga, Tracks | Leave a comment

Grande Utopia Analyzer for Renoise 3.0.1

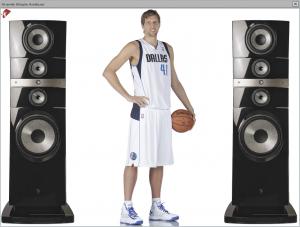
Today I released a new funky, not too serious, xrnx tool for Renoise called “Grande Utopia Analyzer”. It’s an audio signal analyzer which simulates the famous Focal Grande Utopia EM Hifi speakers:

grande_analyzerThe analyzer listens to the left and right audio channels on the master track, and moves the various speaker cones incl. tweeter according to the audio stream’s frequency content. While it’s primarily a fun tool, the analyzer should display the frequency content correctly (approximatively): Sub from 20..80Hz, bass from  80..220Hz, mids from 220..2200Hz, tweeter from 2200..18.200Hz.

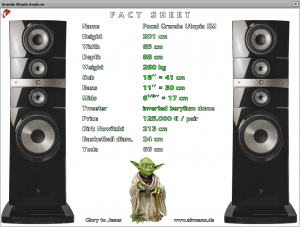
If one clicks on Dirk Nowitzki, a little fact sheet is shown. Check it out:

grande_analyzer_factSince Renoise API actually doesn’t support videos or animated gifs, the biggest problem was to implement the various animations. But I think I’ve found a nice solution which isn’t too hard on the CPU.

Also, it was necessary to insert various signal followers onto the master track: each speaker segment needs a dedicated signal follower – this is unfortunately quite a big dsp chain. Actually I wanted to encapsulate this chain into a doofer device, but the scripting API doesn’t support scripting of doofers – argh !

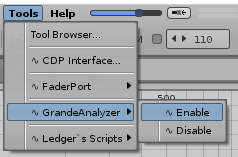
Further, the analyzer can be persistently enabled / disabled via tools menu and hotkeys:

grande_analyzer_menuDownload and installation:

http://www.renoise.com/tools/grande-utopia-analyzer

IMPORTANT HINT: works also for Renoise 3.0.0, but only in mono mode, because of a bug in the signal follower device. I discovered this bug during the development of this tool, and it was fixed in latest Renoise 3.0.1 release.

Posted in Production, Software, Tech Stuff | Leave a comment

FaderPort Emulator for Renoise 3.0

In 2010 I released a driver which integrates the Presonus FaderPort DAW controller into Renoise DAW. See http://blog.airmann.de/renoise-driver-for-presonus-faderport.

Since then, Renoise has evolved to version 3.0 and I updated the driver regularly. Nonetheless, the day will come when the FaderPort hardware won’t be produced anymore and without further development the driver will be useless.

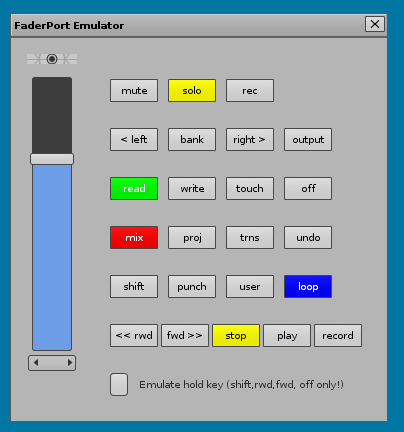
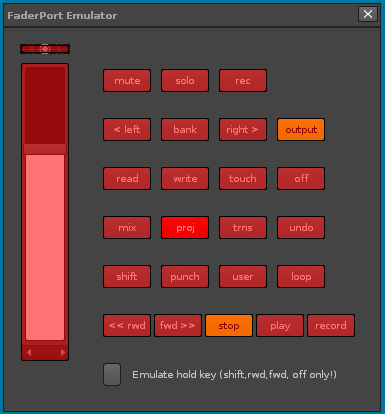
Since I still like the driver’s design and stable codebase, I decided to make it also usable for non-FaderPort owners and created a 1:1 FaderPort software emulator with GUI:

FaderPort Emualtor GUIEmulator Features

  • fully integrated into Renoise 3.0
  • resembles 1:1 with the design of the real hardware
  • acts almost like the real hardware
  • All buttons and controls – especially the fader – can be MIDI-mapped to any 3rd party midi controller.

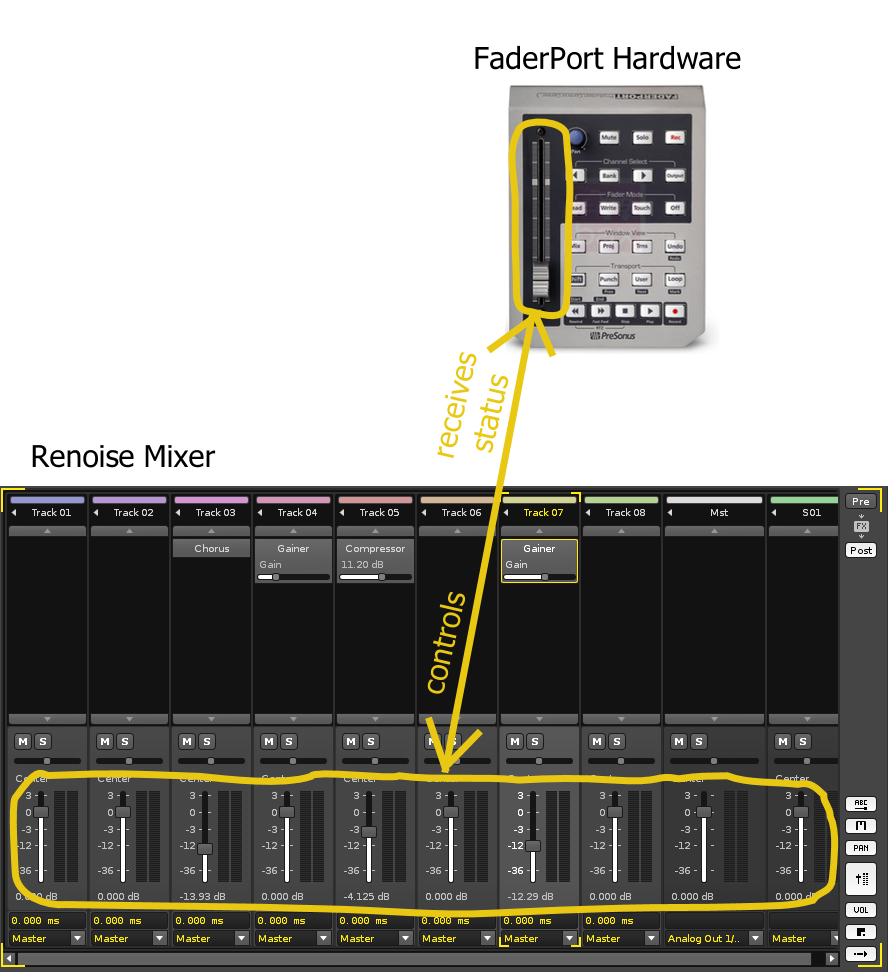
Renoise Integration Of Real HardwareIntegration of real hardwareThe FaderPort’s motorized fader controls the volume level of the currently selected track. Whenever another track is selected, the FaderPort changes it’s position according to the new track’s volume level.

Analogue the FaderPort’s buttons (like play etc.) control Renoise and also reflect Renoise’s state.

Renoise Integration Of Emulator:

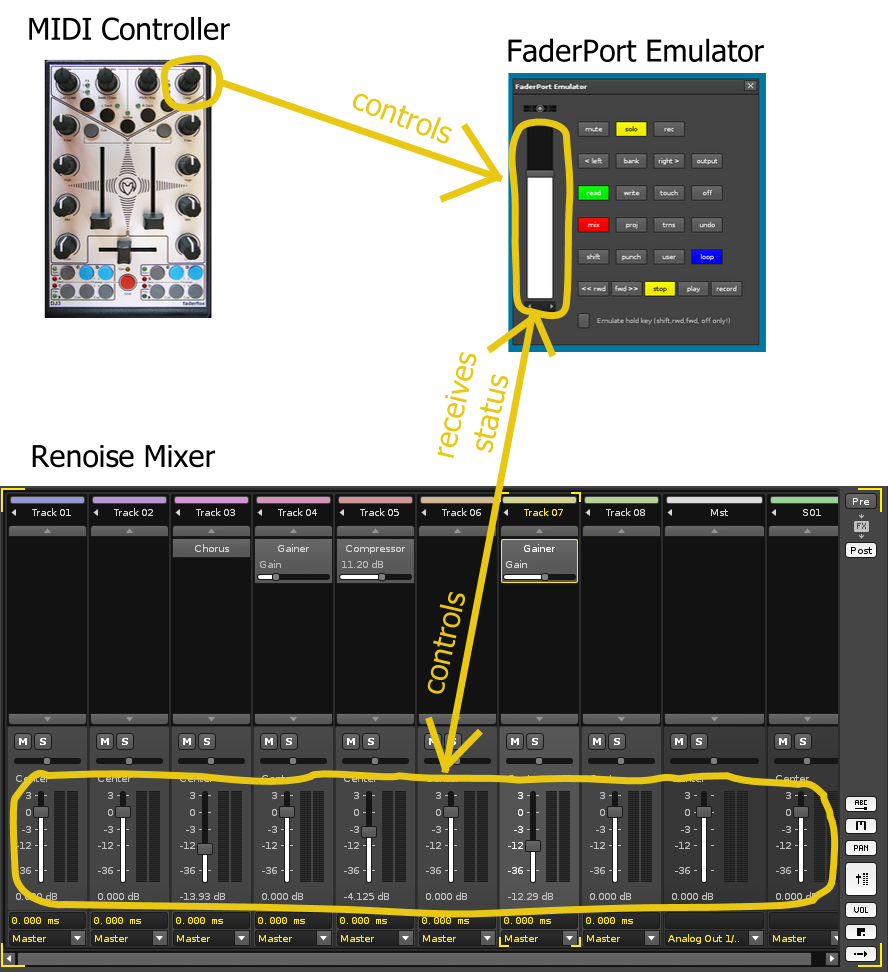
Integration of EmulatorThe emulator’s fader controls the volume level of the currently selected track. Whenever another track is selected, the fader  changes it’s position according to the new track’s volume level.

Moreover, it is possible to midi map any midi controller to the fader, pan and buttons of the emulator GUI dialog:Dialog_Midibind_2In the example above an endless rotary knob is mapped to the emulator’s fader. Means: whenever the knob is turned, the volume level of the currently selected track is changed. The big advantage: regardless of how many tracks a song has, only one rotary knob can control them all ! There’s no need for a huge motorized mixing console etc..

Links:

http://code.google.com/p/airmann-faderport-driver/

You also can download xrnx files via the Renoise tool browser:

http://www.renoise.com/tools/airmann-s-faderport-driver

Posted in Production, Software, Tech Stuff | 3 Comments

How to Rip A Drum Pattern using Reaper DAW

Recently I wanted to rip some drum patterns from various DnB tunes. Main goal was to analyze genre-typical hihat patterns, learn something new and create midi templates for further usage. Reaper’s flexibility came in very handy and in this post I describe the used methods.

First, there exist many beat detector and auto slicing tools on the market. Most DAW’s and DJ Tools have inbuilt functions for onset or transient detection etc.. Usually these functions work well for material with strong transients like e.g. kickdrum and snare, whereas more complex layered beats are usually not sliced properly. I tried several tools but the results were not usable.

So I decided to do the slicing with Reaper DAW by hand, and use automation where possible. In the following I describe my workflow.

PREPARATION

  • Analyze BPM of the source material. I use Mixmeister BPM Analyzer (free), Mixxx DJ Tool (free) or Reaper’s internal functions.
  • Open a new Reaper project, set the BPM to the analyzed value and insert the source material into the first track (in that order)
  • Adjust the Reaper time grid to a desired resolution. 1/16 usually works fine.  Reaper action is “Grid: Set to 1/16”.
  • Move and shift the source material’s kickdrum to the first beat of the bar. For fine adjustment select wave item with left mouse button while holding left shift key. Drag wave form until kickdrum transient matches first beat.
  • Now select 1-2 bars which you want to analyze/slice. Copy those bar(s) out of the source wave form into a new item to a new track “Original”.
  • Copy this item to a further track folder named “WAV”

SLICE SOURCE MATERIAL

  • Disable auto crossfade
  • Slice the item on the “WAV” track using Reaper Action “Item: split items at timeline grid”.  Thus, the item is split into 1/16 parts (see grid resolution above).
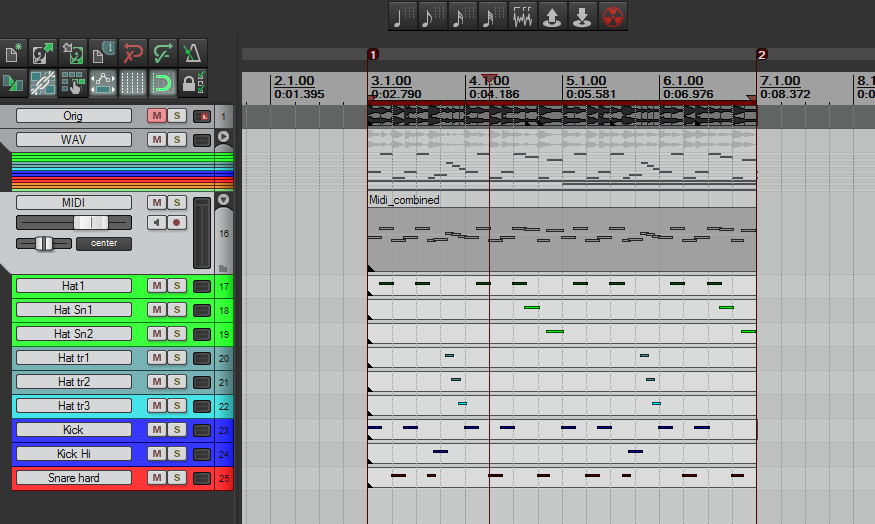
  • Now, grab the kickdrum items and move them to a new track “Kick”. Do the same for “Snare”, “hihat”, “ride”, “crash” whatever. You get the idea. All tracks are children of “WAV” track folder.
  • If two elemets overlay each other like e.g. hihat and kick copy the items instead of moving them. If an item is longer than the grid size (e.g. kick is 1/8), then copy and glue things, or change the grid size etc..
  • If some beat elements don’t start exactly at beat position, or vary in length do the fine adjustment by hand. This may be the case for shuffled beats, natural played beats or humanized stuff etc..  IMPORTANT: if you don’t do this, the later ripped pattern may sound unnatural or “mechanical”.

CONVERT WAV ITEMS TO MIDI EVENTS

  • Create a new track folder called “MIDI”
  • Select all items in e.g. Kick track
  • Convert item positions and length to midi events. Reaper action is “item: Create chromatic midi from items” (my hotkey combination is ctrl-alt-D). Thus, a new track with midi events is created.
  • Move the newly created track to MIDI track folder and name it “Kick”. Do the same for all other tracks (Snare etc.)
  • Important: adjust the size of the generated midi items to your loop size. Usually the midi items are shorter than the loop. All midi items on all midi tracks should have the same length and start position.
  • Unfortunately the created midi events are chromatic, so we have to convert them to “non-chromatic”: double click midi item (= open item in midi editor). Select all midi events (ctrl-A), open note properties (ctrl-F2) and set note value to the desired value (e.g. C2 .. D#3 for fxpansion Geist).

EXPORT MIDI EVENTS

  • Select Kick midi item and call Reaper action “Convert active take MIDI to .mid file reference”. Thus a file “Kick MIDI 001.mid” is created inside project folder.
  • Select Kick midi item again and call Reaper action “Convert active take MIDI to in-project event”. This ensures that the midi item is stored inside the Reaper project file.
  • Do the same for alle other midi items (Snare, etc.).
  • If you want to create a combined midi item which contains all tracks (kick, snare, etc.), then select MIDI track folder, enable “record: output MIDI”. Select loop and start recording.

USAGE IN 3RD PARTY PROGRAMS

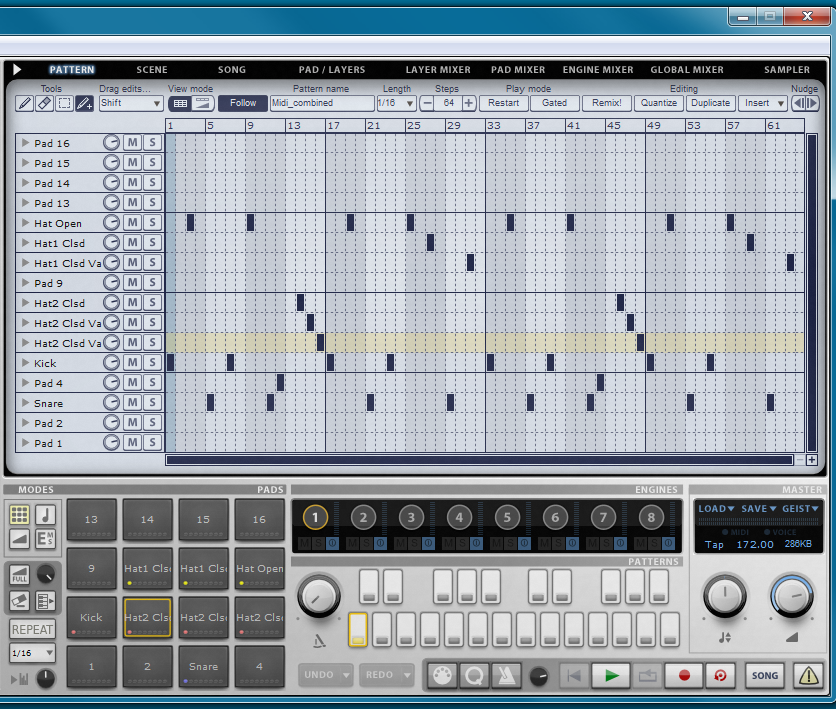
The exported midi items can of course be used in various programs like fxpansion Geist (beat sequencer):

  • import combined midi item: load pattern from midi
  • adjust BPM setting
  • Map samples to pads
  • save everything as Geist preset

SCREENSHOTS

Reaper Beat Ripping

Combined MIDI item

Geist Preset

Posted in Production | 1 Comment

Scalefreq Generator v1.01

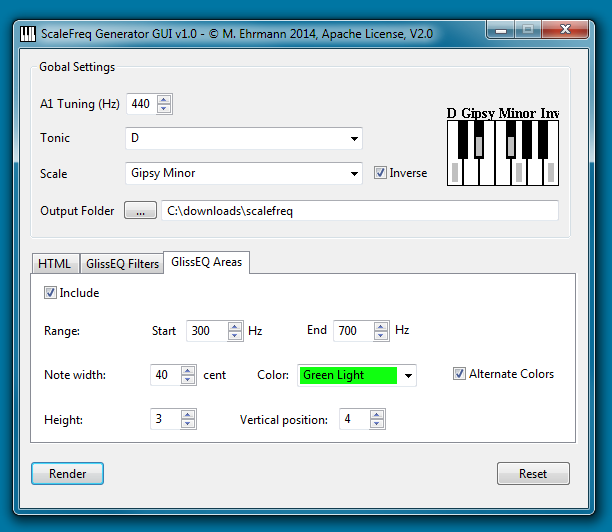
Scalefreq Generator is a tool for rendering frequencies of notes / musical scales into various output formats. It’s primarily aimed for mixing/mastering engineers and other musical interested people. The frequencies of musical scale or non-scale notes (inverse) are important in mixing and mastering situations. E.g. non-scale frequencies are often attenuated using an EQ.

Scalefreq consists of a core system, a render-plugin architecture and a graphical frontend for convenient user interaction.

Currently the following output format renderer are included:

  • HTML Renderer: generates HTML pages which contains scale frequency tables
  • Voxengo GlissEQ Filter Renderer: generates importable EQ presets for Voxengo GlissEQ VST plugin
  • Voxengo GlissEQ Areas Renderer: generates importable EQ Areas presets for Voxengo GlissEQ VST plugin

HTML RENDERER

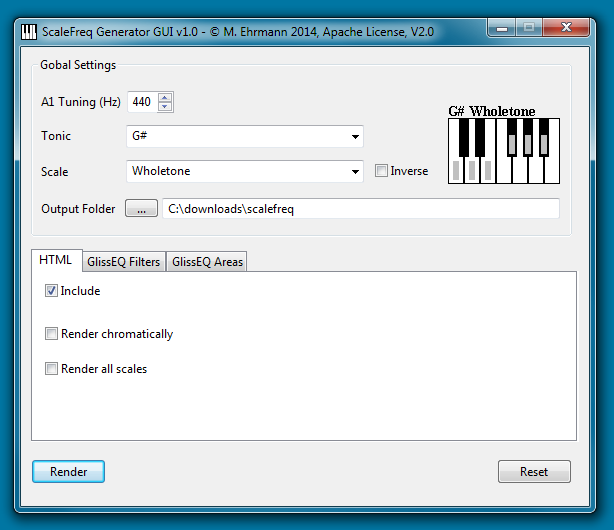
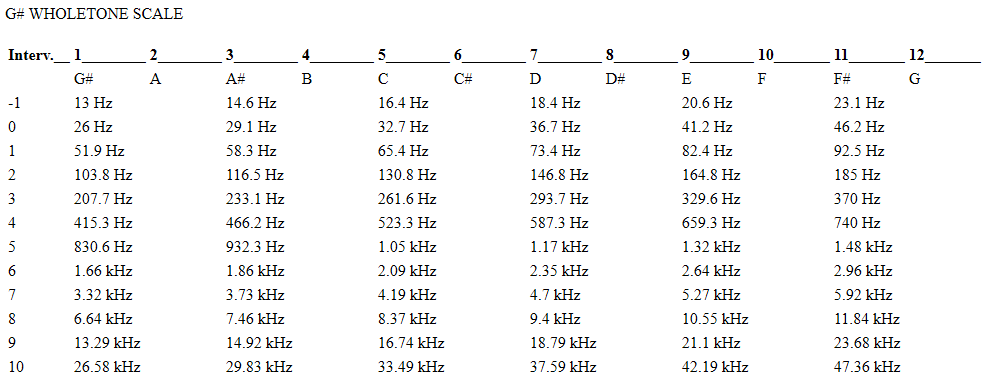
The HTML Renderer creates frequency tables in HTML format for any specific scale. Alternatively it can render all tonic variations of a scale (chromatically). Also a huge HTML file can be generated, which contains all available Scalefreq scales.

Scalefreq GUI

Render output:

HTML output
 

GLISS EQ FILTER RENDERER

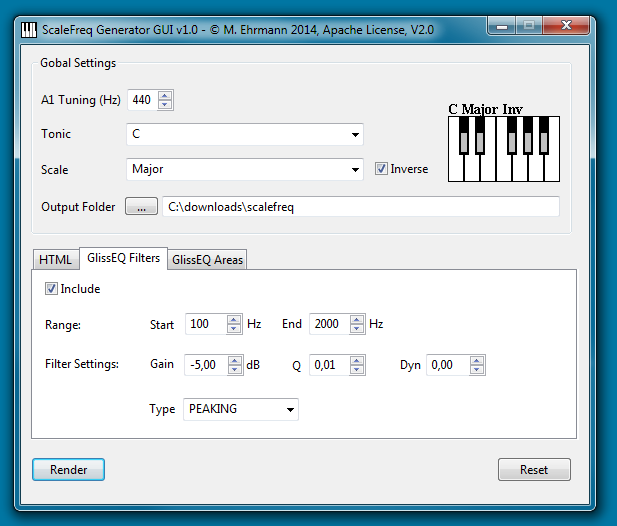
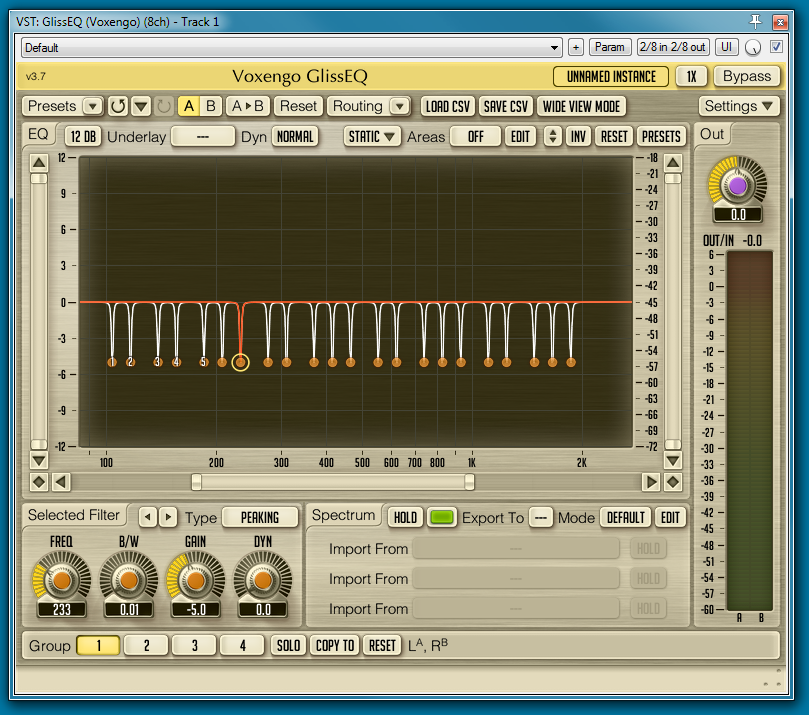
The Gliss EQ filter renderer generates CSV files which can be imported into Voxengo Gliss EQ VST plugin. Thus, it’s e.g. possible to conveniently import notch/peaking filters for non-scale notes (= inverse scale).

GlissEQ Filter Renderer

Imported render output:

GlissEQ Filters


GLISS EQ AREAS RENDERER

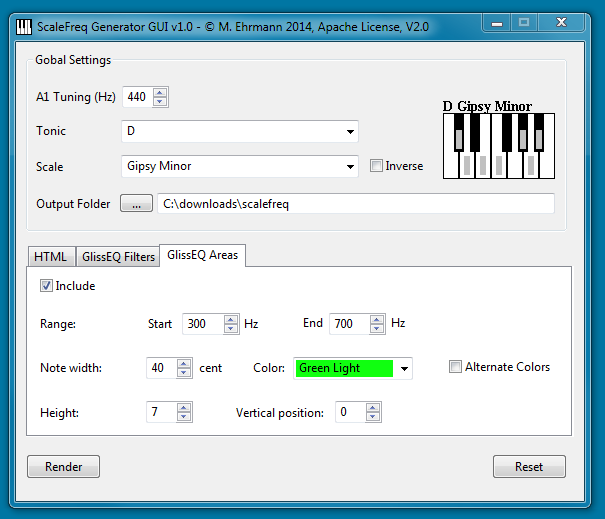
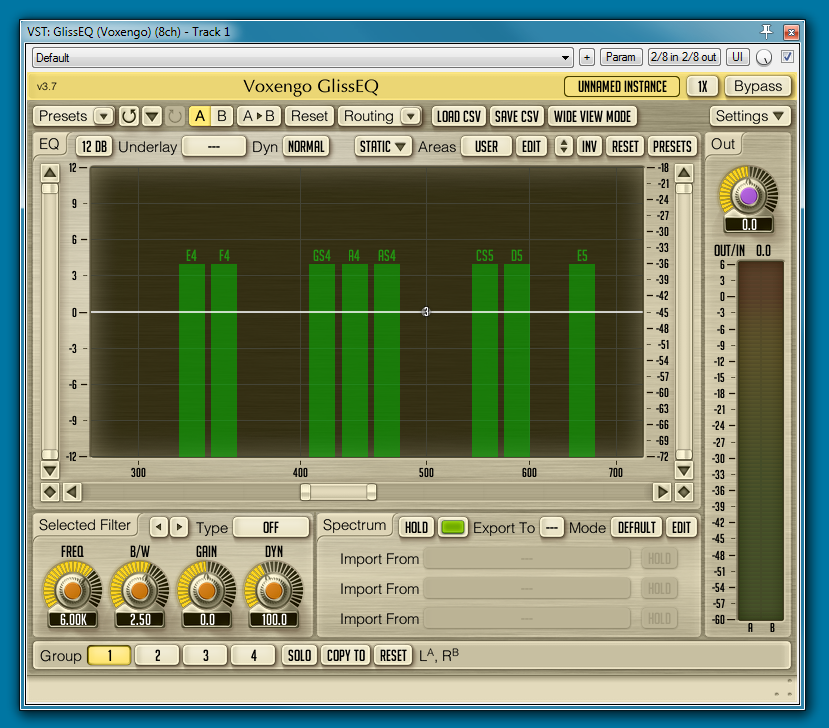
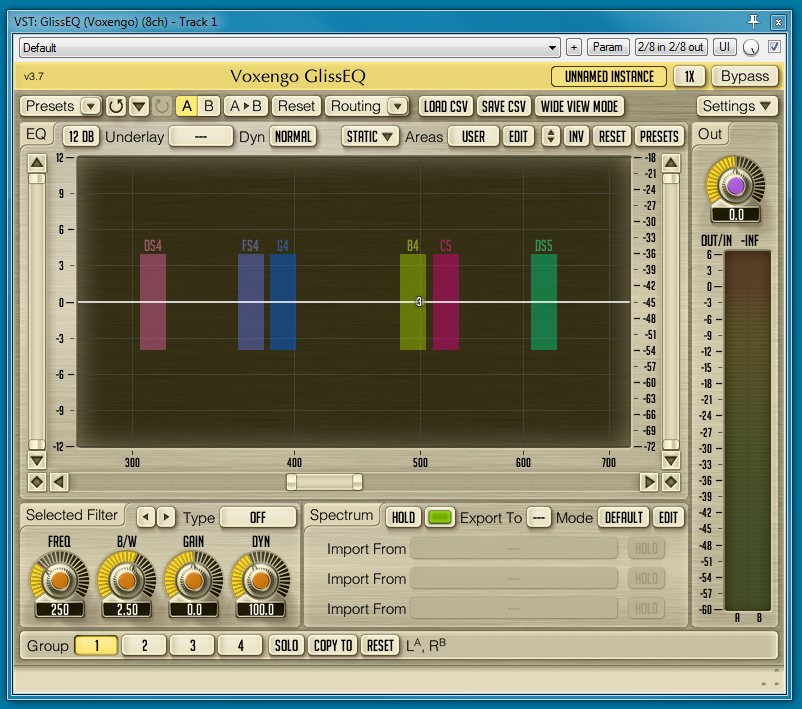
The Gliss EQ area renderer also generates CSV files which can be imported into Voxengo Gliss EQ VST plugin in order to create colorful EQ areas marker.

GlissEQ Areas Renderer

Imported render output:

GlissEQ areas

Inverse and alternate colors:

GlissEQ Areas Renderer Alternate

Imported render output:

GlissEQ Areas Alternate


DOWNLOAD

http://blog.airmann.de/wp-content/uploads/2014/01/scalefreq_1_01.zip


INSTALLATION

A Java 1.7 Runtime Environment (JRE or JDK) is required.
The following platforms are supported:

  • Windows (32/64)
  • Linux GTK (32/64)
  • MacOS (32/64)

In order to start the program, just double click the file “scalefreq_1_01.jar”. If this doesn’t work, try to start from the command line:
java -jar scalefreq_1_01.jar

E.g. on windows:
press windows key+r, "cmd" -> java -jar path to scalefreq_1_01.jar

HINT: scalefreq stores all made settings in the current user profile. In order to reset the settings press the reset button.


FURTHER HINTS

If you want to develop another plugin/renderer for Scalefreq (really easy !) just contact me. I’ve planed to release the source code if enough people are interested.

Also if you’re interested in different scales etc. just let me know !


CHANGELOG

  • 1.0 – initial release
  • 1.01 – proper multi platform support for Win,Mac,Linux (all 32/64), better font for multi platform (Arial), default frequency range for GlissEQFilter renderer is now 20 Hz..20 KHz
Posted in Production, Software, Tech Stuff | 20 Comments